iPhone Won't Restore in Recovery Mode? Fix It Fast
iPhone won't restore in Recovery Mode? Follow Apple's current cable, host-software, Update, and service steps for common restore errors safely.
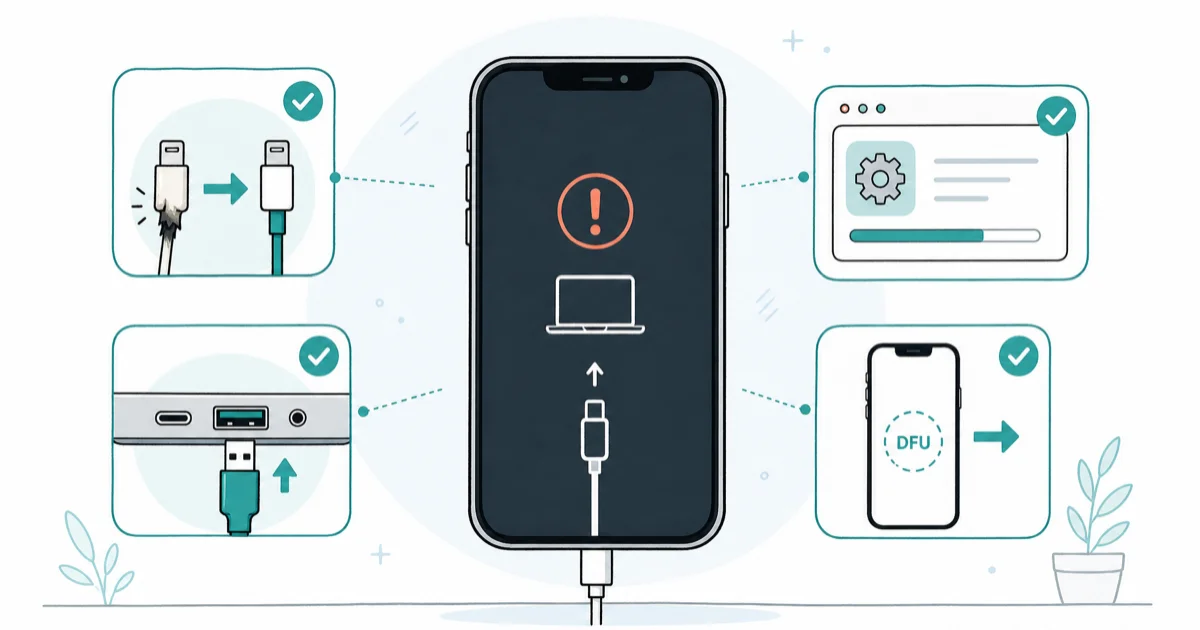
Quick AnswerUpdate macOS or iTunes, force restart the iPhone, connect it directly with another USB cable, and choose Update before Restore. If the same error returns, try another computer or contact Apple.
Your iPhone is stuck in Recovery Mode and the update or restore keeps failing. A lost connection or a computer that can’t direct the restore can trigger errors 9, 4005, 4013, or 4014. The steps below follow Apple’s current troubleshooting order.
Start at the top. Only escalate if the previous step fails.
Use these recovery steps only on an iPhone you own or are authorized to service. Accessing or attempting to recover another person’s device or data without permission may violate privacy laws. Don’t use restore or account-access tools to bypass a passcode, Activation Lock, or data protections.
- Start with current macOS or iTunes, a direct USB connection, and a working cable.
- Choose Update before Restore so the first attempt doesn’t erase the iPhone.
- If the alert returns, retry with another USB cable or another computer.
- Make a backup before any destructive restore if the iPhone can still start normally.
- Third-party repair tools and DFU are optional advanced routes, not substitutes for Apple Support.
#Why Does Your iPhone Refuse to Restore in Recovery Mode?
Recovery Mode lets a computer update or restore an iPhone that won’t start normally. When communication fails, you may see error 9, 4005, 4013, or 4014 on the computer.
According to Apple’s support article for errors 9, 4005, 4013, and 4014, these codes can appear if the iPhone disconnects during an update or restore, or if the computer couldn’t tell the device to restore. Apple recommends updating macOS or iTunes, force restarting the iPhone, reconnecting it by USB, and choosing Update rather than Restore first. If the alert returns, try another USB cable or computer.
That sequence makes the host software and physical USB connection the first things to check. Inspect the cable for damage, connect directly to the computer instead of through a hub, and keep the computer online while it downloads the firmware.
#Prepare Before You Retry the Restore
Get the backup, host software, and physical connection ready before another attempt.
#Back up before anything else, if the phone still responds
If your iPhone still boots, can be unlocked, and can trust the computer, create an encrypted local backup before another Recovery Mode attempt. Encrypted backups include Health data and saved Wi-Fi passwords.
Apple’s iPhone backup support page confirms that encrypted computer backups can include saved passwords, Wi-Fi settings, Health data, call history, and HomeKit data. Check Apple’s current comparison before assuming an unencrypted backup contains the same categories.
If the phone is already locked in Recovery Mode and won’t boot, you can’t make a fresh backup. Skip ahead.
#Update Finder, iTunes, or the Apple Devices app
Use current host software before reconnecting the iPhone:
- macOS Catalina or later: use Finder. Run Software Update first to pull the latest macOS point release, since the device support files travel with the OS.
- Windows: install the Apple Devices app from the Microsoft Store or update iTunes before retrying.
- Older macOS versions: update iTunes to the newest version available for that Mac.
#Inspect the cable, port, and computer
Use a known-good cable that supports data transfer and fits both the iPhone and computer. Look at the connector pins under bright light. Any green tarnish or bent pin means swap it.
Plug directly into the computer, not through a USB hub or a monitor’s downstream port. Reboot the computer once before retrying.
Restarting the computer is a low-risk check before another attempt.
#Force Restart and Re-Enter Recovery Mode Cleanly
The Recovery Mode button combo depends on the iPhone model.
For iPhone 8 and later, including all Face ID models, press Volume Up and release, press Volume Down and release, then hold the Side button. Keep holding past the Apple logo until you see the Recovery Mode screen with the cable-and-laptop icon.
For iPhone 7 and 7 Plus, hold the Top or Side button and Volume Down together until the same screen appears. For iPhone 6s, SE first generation, and earlier, hold Home and the Top or Side button together.
Apple’s force restart guide lists the current button pattern for iPhone.
Already at the Recovery Mode screen? Force restart, reconnect the USB cable, open Finder or the Apple Devices app, and enter Recovery Mode again before you click Update or Restore.
If the phone restarts into a repeating loop instead of showing the Recovery Mode screen, use the separate iPhone boot loop guide before attempting another restore.
Stuck on Apple logo too?
If your phone is also caught on the iPhone stuck on Apple logo symptom, don’t infer the cause from the logo alone. Try Apple’s Update path first; choose Restore only when you’re prepared to erase the device and recover from a backup.
#Should You Try a Third-Party Repair Tool?
This optional vendor route isn’t part of the Apple article above. Consider it only before a destructive restore.
Tenorshare ReiBoot markets a Standard Repair mode for recovery loops and stuck updates. Treat that as a vendor claim, not a guarantee: back up first if possible, download only from the publisher, and review how its privacy policy handles device identifiers, diagnostics, and other connected-device data.
Some links on this page are affiliate links, which means fone.tips may earn a commission at no extra cost to you.
Tenorshare’s ReiBoot product page states that Standard Repair is intended to preserve data, while its deeper repair route erases the device. Results still depend on the fault and aren’t independently guaranteed.
iToolab FixGo is another third-party option, but its current capabilities aren’t independently verified here. Don’t enter your Apple Account password into a repair utility, and skip any tool that advertises iCloud bypass or Activation Lock removal.
If you don’t trust the software or the iPhone contains irreplaceable data, skip this route and contact Apple Support.
#DFU Is a Destructive Last Resort
DFU instructions circulate as an advanced restore technique, but they aren’t part of the Apple troubleshooting sequence cited here. Treat any DFU restore as destructive. Don’t use it as another non-erasing experiment after Update fails.
Exact entry steps vary by model, and a mistake can leave you repeating the same restore loop. If you choose this route, verify the steps for your exact device with a qualified technician and make sure you have a usable backup first. The broader iPhone won’t restore guide explains the difference between Update, Restore, and service escalation.
#When Software Won’t Fix It: Hardware and Apple Support
Persistent errors can also come from the cable, computer, USB port, or iPhone hardware. Testing another cable and another computer helps separate those paths without guessing from the error number alone.
Seek service if no computer recognizes the iPhone with a known-good cable, the device shuts off as soon as it’s connected, or there is visible impact or liquid damage.
Apple’s Get Support page starts an online diagnosis or service request.
Check any Apple warranty or AppleCare coverage before authorizing a paid repair, and get a written diagnosis before replacing parts.
#Bottom Line
Start with current host software, a direct USB connection, a working cable, and a clean force restart back into Recovery Mode. Choose Update before Restore.
If the same error returns with another cable or computer, contact Apple. A third-party standard repair mode is optional, and its non-erasing claim isn’t a guarantee; a full restore or DFU restore is destructive.
Don’t diagnose a failed component or buy a repair tool from the error code alone.
#Frequently Asked Questions
Will restoring my iPhone in Recovery Mode erase all my data?
Yes. A Recovery Mode restore reinstalls iOS and wipes the device. Separately synced iCloud data may return after sign-in, while an existing iCloud or computer backup can restore additional content and settings.
How long should the restore process take?
There isn’t one reliable duration. The download, computer, USB connection, and iPhone model all affect the process, so follow the progress and any alert in Finder, Apple Devices, or iTunes.
Can I exit Recovery Mode without restoring my iPhone?
Try a force restart with your model’s button combo. If iOS is healthy, the phone returns to the lock screen. If it’s corrupted, the phone falls back into Recovery Mode every time.
What is the difference between Recovery Mode and DFU mode?
Recovery Mode is Apple’s documented computer-assisted update and restore path. DFU is an advanced, destructive technique described outside the Apple article used here. If Apple’s Recovery Mode steps fail, service is safer than improvising model-specific DFU timing from an unverified guide.
Are third-party iOS repair tools safe to use?
These are third-party products, not Apple support tools. If you use one, make a backup first, download it from the publisher, review its privacy terms, and avoid software that asks for your Apple Account password or advertises iCloud bypass. A vendor’s non-erasing mode can still fail, so don’t treat it as a substitute for a backup.
What if my iPhone gets stuck during the restore process?
Note the message or error code shown on the computer. If progress stops and the computer reports an alert, restart the documented sequence, reconnect directly by USB, and try another cable or computer. Contact Apple if the same alert returns.
How do I unlock my iPhone if the screen is broken during all this?
Don’t dictate the iPhone passcode aloud. If the screen won’t accept touch, arrange an authorized screen repair; recover from an existing backup only after the device is repaired or erased.
Mac mini M6 vs M5 Pro: Which Model Should You Buy?
Mac mini M6 vs M5 Pro compared on price, memory, ports, displays, and real workloads. Find the better 2026 Mac mini for your desk and budget.
Apple Siri Settlement: Who Qualifies and How to Claim
Apple's $250 million Siri settlement covers iPhone 15 Pro and iPhone 16 models bought June 2024 to March 2025. See who qualifies and how claims work.
iOS 26.6.1 Security Update: What Apple Fixed and Who Gets It
Apple released iOS 26.6.1 on August 17 with 29 security fixes, including an IPSec interception bug. See what it patches, who gets it, and how to update.
iPhone Adaptive Power: How It Works and When to Use It
Learn how iPhone Adaptive Power works, which models support it, what it changes, and when Low Power Mode is still the better battery-saving choice.