Locked Out of iPhone: Official Ways to Get Back In (2026)
Locked out of your own iPhone? Try the previous-passcode window, then use Apple's on-device, computer, Find My, or service routes with clear erase limits.
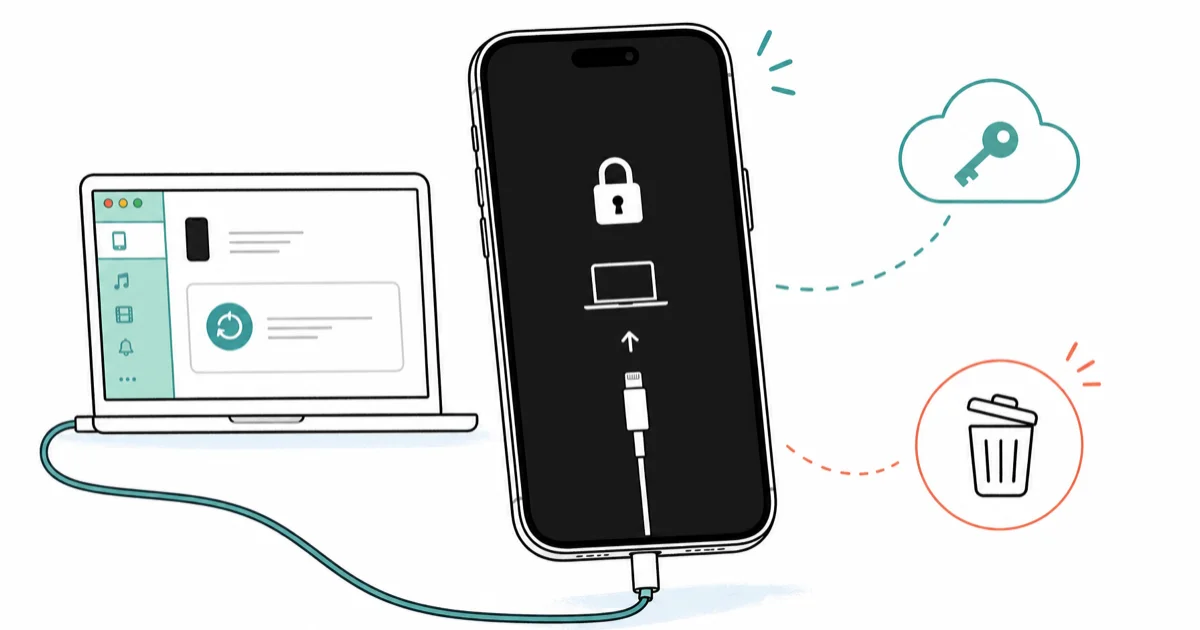
Quick AnswerOn iOS 17 or later, try a previous passcode changed within 72 hours. Otherwise, use Apple’s on-device or computer reset; both erase current device data.
Being locked out of your own iPhone is fixable. A recently changed passcode can sometimes be replaced without erasing the device; the other Apple-supported reset routes erase current device data, so a prior backup still matters.
Use these steps only on an iPhone you own or have explicit permission to reset.
- On iOS 17 and later, a previous passcode remains available for 72 hours after a passcode change unless you expire it sooner.
- Apple Platform Security documents escalating delays after invalid passcodes; after 10 or more attempts the device is locked and needs a Mac or PC unless another supported reset path is available.
- On iOS 15.2 or later, an eligible device can be reset from its lock screen when Find My, network access, and the Apple Account password are available.
- Computer reset, on-device reset, and Find My erase remove current device data; only the Previous Passcode route preserves it.
- Apple Support can help you reset an owned device but can’t reveal or bypass its passcode.
#How Does an iPhone Lockout Actually Happen?
According to Apple’s Platform Security guide, iOS and iPadOS impose escalating delays after invalid passcodes. Repeating the same incorrect passcode doesn’t count again toward the Erase Data threshold.
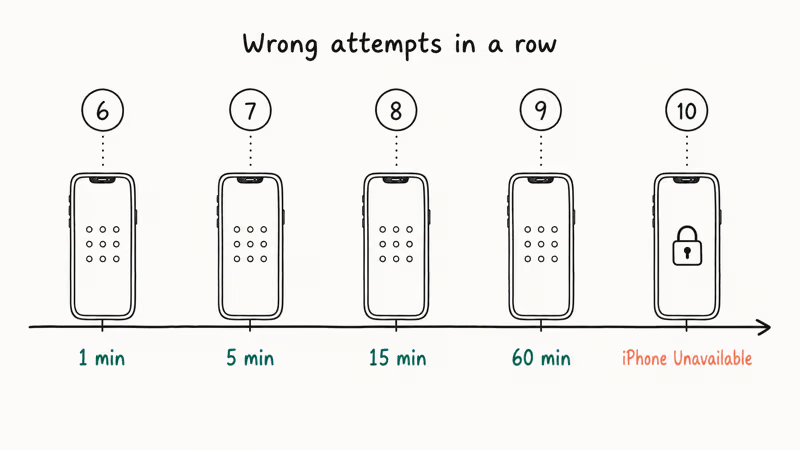
| Invalid-passcode attempt | Apple-documented iOS/iPadOS delay |
|---|---|
| 3 | No delay |
| 4 | 1 minute |
| 5 | 5 minutes |
| 6 | 15 minutes |
| 7 | 1 hour |
| 8 | 3 hours |
| 9 | 8 hours |
| 10 or more | Locked; needs connection to a Mac or PC |
If Erase Data is enabled under Face ID & Passcode or Touch ID & Passcode, Apple says 10 consecutive incorrect attempts remove all content and settings. Don’t enable that option without understanding that the erased local data can return only from an existing backup or cloud sync.
Everything below assumes the iPhone is yours. For someone else’s phone, see our iCloud Activation Lock guide.
#Computer Reset With Recovery Mode
Recovery Mode is Apple’s official, free way to restore a locked iPhone from a Mac or PC. The restore time depends mainly on the firmware download and your connection.
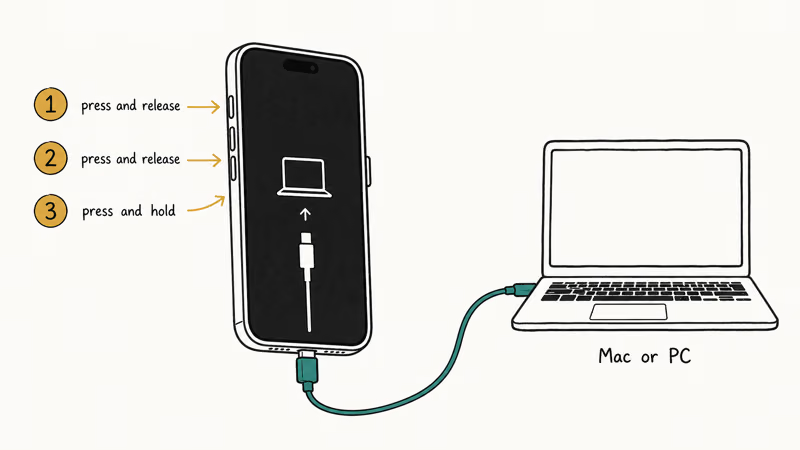
Apple’s current computer-reset guide confirms that you’ll need a charging cable, a Mac or Windows PC, and an internet connection. Use Finder on Mac or Apple Devices on Windows.
#Step 1: Put the iPhone in Recovery Mode
Turn off the iPhone, then hold the matching button as you connect it:
- iPhone with Face ID, iPhone 8/8 Plus, or iPhone SE (2nd/3rd generation): hold the Side button.
- iPhone 7 or 7 Plus: hold Volume Down.
- iPhone 6s or earlier, or iPhone SE (1st generation): hold the Home button.
If the Apple logo appears and stays, you let go too early. Start over.
#Step 2: Restore From Finder or iTunes
- In Finder or Apple Devices, select the iPhone.
- Choose Restore when the computer offers Restore or Update.
- Let the software download and restore finish. If the download takes long enough that the iPhone leaves Recovery Mode, let the download finish, turn off the iPhone, and enter Recovery Mode again.
- After the restore, follow the Hello-screen setup and sign in to the Apple Account linked to the iPhone.
If the restore stalls, see our walkthrough for an iPhone stuck on the restore screen and our fix for when an iPhone won’t restore in Recovery Mode.
Trade-off: Recovery Mode is official, but it erases data and needs an internet-connected Mac or PC.
#Try the Previous Passcode Before Erasing
If you changed the passcode recently, use this route before Recovery Mode. Apple’s Passcode Reset guide says iOS 17 and later keep the previous passcode usable for 72 hours unless you expire it sooner.
- On the iPhone Unavailable screen, tap Forgot Passcode?.
- Tap Enter Previous Passcode.
- Enter the old passcode and follow the prompts to set another passcode.
This route does not reset the device. If Enter Previous Passcode is unavailable or the old passcode is unknown, stop guessing and choose one of the erase routes below.
#Reset iPhone From the Lock Screen (iOS 15.2 or Later)
Apple’s on-device reset guide states that this route needs Find My already enabled, cellular or Wi-Fi access, and the Apple Account password. On iOS 17 and later the entry point is Forgot Passcode?; on iOS 15.2 and iOS 16 it’s Erase iPhone.
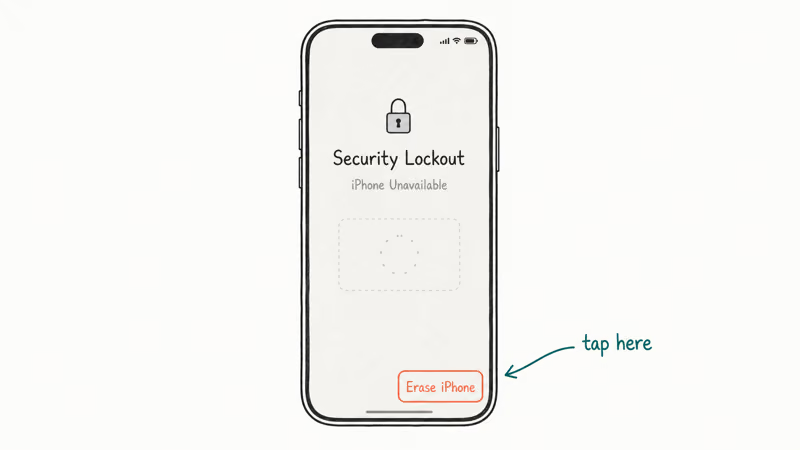
- Wait for the device to show iPhone Unavailable.
- On iOS 17 or later, tap Forgot Passcode?, then Start iPhone Reset. On iOS 15.2 or iOS 16, tap Erase iPhone.
- Enter the Apple Account password to sign out on the device.
- Tap Erase iPhone to permanently delete its data and settings.
- When the iPhone restarts, complete setup and restore an existing backup if you have one.
Requirements:
- The iPhone must be on iOS 15.2 or later.
- The device needs Wi-Fi or cellular data connected so it can sign out of the linked Apple Account.
- You must know the Apple Account password tied to the device. Without it, use the computer-reset route.
The password check signs the Apple Account out before the erase. It isn’t a bypass for someone else’s phone.
#Remote Erase With Find My
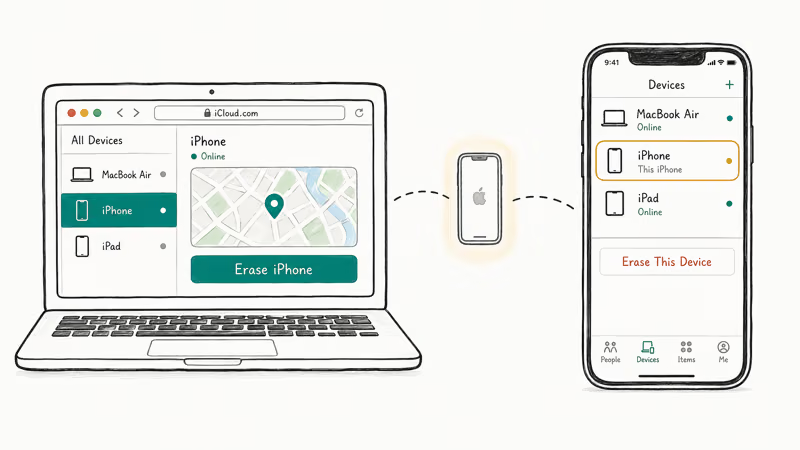
If you set up Find My before the lockout, you can erase from another Apple device or a browser without touching the locked iPhone. This is the no-cable path when the iPhone is somewhere else or you don’t have a cable handy. The erase runs once the device comes online.
#Erase via iCloud.com
- On any browser, open iCloud.com/find and sign in with your Apple Account.
- Click All Devices at the top.
- Select the locked iPhone.
- Click Erase iPhone, confirm with your Apple Account password, and complete any required verification.
- The next time the iPhone is online, it wipes and shows the Hello setup screen.
#Erase via the Find My App
- On another iPhone, iPad, or Mac signed in with your Apple Account (or a Family Sharing member’s), open the Find My app.
- Tap the Devices tab.
- Tap the locked iPhone in the list.
- Scroll down and tap Erase This Device → Continue.
Apple’s current Find My erase guide says an offline erase remains pending until the device next connects to Wi-Fi or cellular service. To review the linked devices before erasing anything, use the Apple Account device list or Find My rather than an IMEI-checking service.
Pros: No computer, no cable, works fully remote. Cons: Erases the device; only works if Find My was enabled before the lockout and the device can reach the internet.
#Get Help From Apple
If you can’t enter Recovery Mode because the buttons don’t respond, Apple’s computer-reset guide says the iPhone may need service. If you can’t borrow a computer, Apple directs you to an Apple Store or Apple Authorized Service Provider.
Bring ownership proof. Service can reset the phone, but it can’t reveal the passcode or preserve erased local data.
#Saving Your Data Before You Erase
Sometimes, but only if you prepared in advance. Once iPhone Unavailable shows up, the device is locked at the operating-system level, so most data extraction options are off the table. The realistic paths are:
- Pre-existing iCloud backup: Check your available backups from another signed-in Apple device. If a usable backup predates the lockout, you can choose it during setup after the reset.
- Pre-existing Finder, Apple Devices, or iTunes backup: Check the computer for a dated backup that was completed before the lockout. A prior Trust confirmation only permits communication; it does not prove that a backup was created.
- Previously paired computer: A prior pairing can sometimes avoid a new Trust prompt, but it does not guarantee that a new backup can start while the iPhone is locked. Verify that Finder or Apple Devices actually recognizes the phone, shows Back Up Now as available, and completes a dated backup before relying on it. Our walkthrough on the Trust This Computer prompt explains what changes after trust settings are reset.
After an erase, only data already synced elsewhere or included in a usable backup can return through Apple’s consumer recovery routes. Commercial unlock promises don’t change Apple’s documented erase and Apple Account requirements; specialized forensic capabilities vary and are not a recovery path consumers should depend on.
#How Do You Avoid Getting Locked Out Again?
A few habits keep the next lockout from being your problem:
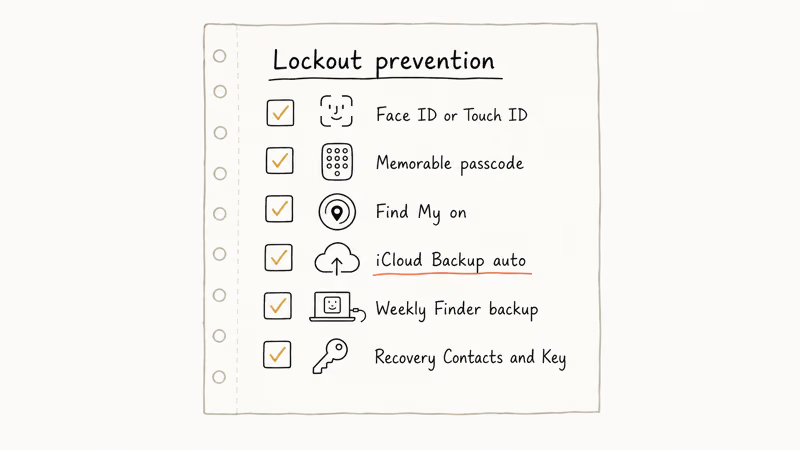
- Turn on Face ID or Touch ID. Biometrics reduce how often you type the passcode, while the passcode still remains required in security-sensitive situations.
- Pick a 6-digit numeric or alphanumeric passcode you can actually remember. Storing it in 1Password or iCloud Keychain on a separate device is fine; sticky notes on the back of the phone are not.
- Enable Find My. Go to Settings → your name → Find My → Find My iPhone. Without it, the remote and on-device erase routes are unavailable.
- Set up automatic iCloud Backup. Go to Settings → your name → iCloud → iCloud Backup, then make sure the backup can complete with the storage available to your account.
- Keep a computer backup when appropriate. In Finder or Apple Devices, select the iPhone and use the backup controls under General.
- Review Apple Account recovery options. In Settings → your name → Sign-In & Security, consider a recovery contact. Only enable a recovery key if you understand that it turns off Apple’s standard account-recovery process.
#Bottom Line
Start with Previous Passcode on iOS 17 or later if the passcode was changed within the last 72 hours. If that is unavailable and the on-device requirements are met, use Forgot Passcode? or Erase iPhone on the lock screen. Otherwise, use Apple’s computer-reset route.
After setup, confirm that iCloud Backup or your chosen computer-backup routine completes successfully. A toggle without a completed backup does not protect the data.
For older devices that show the iPhone is disabled message instead of Security Lockout, the fix is the same: Recovery Mode, then restore.
#Frequently Asked Questions
Will unlocking my iPhone erase all my data?
Passcode Reset with a previous passcode can preserve data during its 72-hour window. Recovery Mode, the on-device reset, and Find My erase remove current device data; only existing backup or cloud-synced data can return afterward.
Can Apple unlock my iPhone for me at the Apple Store?
No. Apple can’t bypass your passcode, even at a Genius Bar with proof of ownership. The Genius Bar can verify your account and walk you through Recovery Mode, but the data still gets erased.
How many wrong attempts before the iPhone locks permanently?
Apple’s current security table says 10 or more invalid-passcode attempts leave iOS locked and needing a Mac or PC. If Erase Data is enabled, 10 consecutive incorrect attempts remove all content and settings instead. Repeating the same incorrect passcode does not count again toward that erase threshold.
Can I unlock an iCloud-locked iPhone I bought used?
Only with the original owner’s help or Apple’s documented proof-of-purchase support process. Activation Lock removal requires the Apple Account used to set up the device, removal through Find My, help from the owning organization, or a valid support request. The right move for a found iPhone is to return it.
Is it legal to unlock a locked iPhone?
You may reset an iPhone you own. For someone else’s device, proceed only with the owner’s clear authorization and in compliance with applicable law; return a found iPhone rather than trying to access it.
What if I don’t have a computer and Find My is off?
The on-device reset and remote Find My erase both require Find My to have been enabled before the lockout. If it was off, borrow a computer for Recovery Mode or visit an Apple Store or Apple Authorized Service Provider for help with the computer reset.
Is there any way to recover data if I have no backup?
Not through Apple’s consumer reset routes. After an erase, only data that was already synced to a service or included in an existing backup can return; data that existed only on the locked iPhone does not.
How do you enter Recovery Mode on a current Face ID iPhone?
Turn off the iPhone. Connect the cable to the Mac or Windows PC, then connect it to the iPhone while holding the Side button. Keep holding through the Apple logo until the computer-and-cable image appears. Those are the current steps in Apple’s computer-reset guide for Face ID models.
Mac mini M6 vs M5 Pro: Which Model Should You Buy?
Mac mini M6 vs M5 Pro compared on price, memory, ports, displays, and real workloads. Find the better 2026 Mac mini for your desk and budget.
Apple Siri Settlement: Who Qualifies and How to Claim
Apple's $250 million Siri settlement covers iPhone 15 Pro and iPhone 16 models bought June 2024 to March 2025. See who qualifies and how claims work.
iOS 26.6.1 Security Update: What Apple Fixed and Who Gets It
Apple released iOS 26.6.1 on August 17 with 29 security fixes, including an IPSec interception bug. See what it patches, who gets it, and how to update.
iPhone Adaptive Power: How It Works and When to Use It
Learn how iPhone Adaptive Power works, which models support it, what it changes, and when Low Power Mode is still the better battery-saving choice.